PA6 - Reinventing the (Pytorch) Wheel
Objective
In the last PA, you implemented a tiled image convolution to create image filters. As it turns out, we can use those filters to extract meaningful information from the image (lines, shapes, textures, etc.) to help build some intelligent tasks.
In this project, you will be using OpenCL to build a batched, strided, dilated, tiled convolution to replace PyTorch’s conv2d function for convolutional neural networks (CNNs). Oh, you will also make it fast, too.
This project has a few stages to go through, so PLEASE READ THE DOCS FULLY before starting. Remember to start early and start often.
Instructions
Part 0: What is PyTorch and why is it Fire?
PyTorch is a massive open-source machine learning framework frequently used for building and training machine learning models. By and large, most models made currently are in PyTorch. Now Pytorch has several backends where these matrix operations can occur (think CUDA, Metal, some CPU vector library). For OpenCL, there is an external plugin that you can build and install to use PyTorch with OpenCL (which we have done in the Docker container to get some models working with OpenCL! If you are interested in learning how this works, see the bottom of the instruction docs!
But let’s say we wanted to replace some of these Neural Network Operations with our own wonderful OpenCL kernels. This PA, we will pull PyTorch open slightly and get our kernels working.
Note, you are not expected to know or understand how to train models in pytorch, but for this assignment, we are going to be gutting open this library a little bit in order to add our custom conv2d implementation. So we are going to dive into the anatomy of PyTorch Models.
The basic building block of a PyTorch model is nn.Module, the basic class describing Neural Networks or their subcomponents (which are themselves modules). This can describe at a high level what layers a model may contain. In addition, modules also define how these submodules can apply operations onto some input data x in the forward method of a module.
One such example can be seen below.
import torch
import torch.nn as nn

class NeuralNetwork(nn.Module):
    def __init__(self):
        super(NeuralNetwork, self).__init__()
        self.fc1 = nn.Linear(10, 8)
        self.fc2 = nn.Linear(8, 4)
        self.fc3 = nn.Linear(4, 2)

        self.sigmoid = nn.Sigmoid()

    def forward(self, x):
        # Layer 1
        x = self.fc1(x)
        x = self.sigmoid(x)

        # Layer 2
        x = self.fc2(x)
        x = self.sigmoid(x)

        # Output layer
        x = self.fc3(x)
        x = self.sigmoid(x)

        return x
model = NeuralNetwork()
model(torch.randn(1, 10))
The key takeaway here is that the forward function actually does the operations on some input data.
This forward function is automatically called when we call model(torch.randn(1, 10)) (i.e., model.forward(torch.randn(1, 10)), its the same thing in this case).
Each layer is composed of a fully connected layer, or Linear layer that is computing the function f(x) = w^Tx +b for a weight matrix W and some bias b. This is the most basic neural block you can imagine.
So those fully connected (fc) layers, when we call, for example, self.fc1(x), also call self.fc1.forward(x) that does the operation  with a weight matrix W and some bias b saved in the model (see docs on nn.linear).
Which means, technically, one could just replace the forward function of a linear layer with a function that calls some OpenCL scripts to compute the operation . So let’s start there.
Part 1: Implement Large Language Models
Okay, that is a joke; we are just replacing the linear layers of GPT2 with OpenCL.
Before we start messing with convolutions, we are going to walk through how we are working with PyTorch by replacing these linear layers. That should give you an idea of how the code in this PA works. So for this part, similar in many ways to PA1, we will go through the code step by step to show you how the new build scripts work.
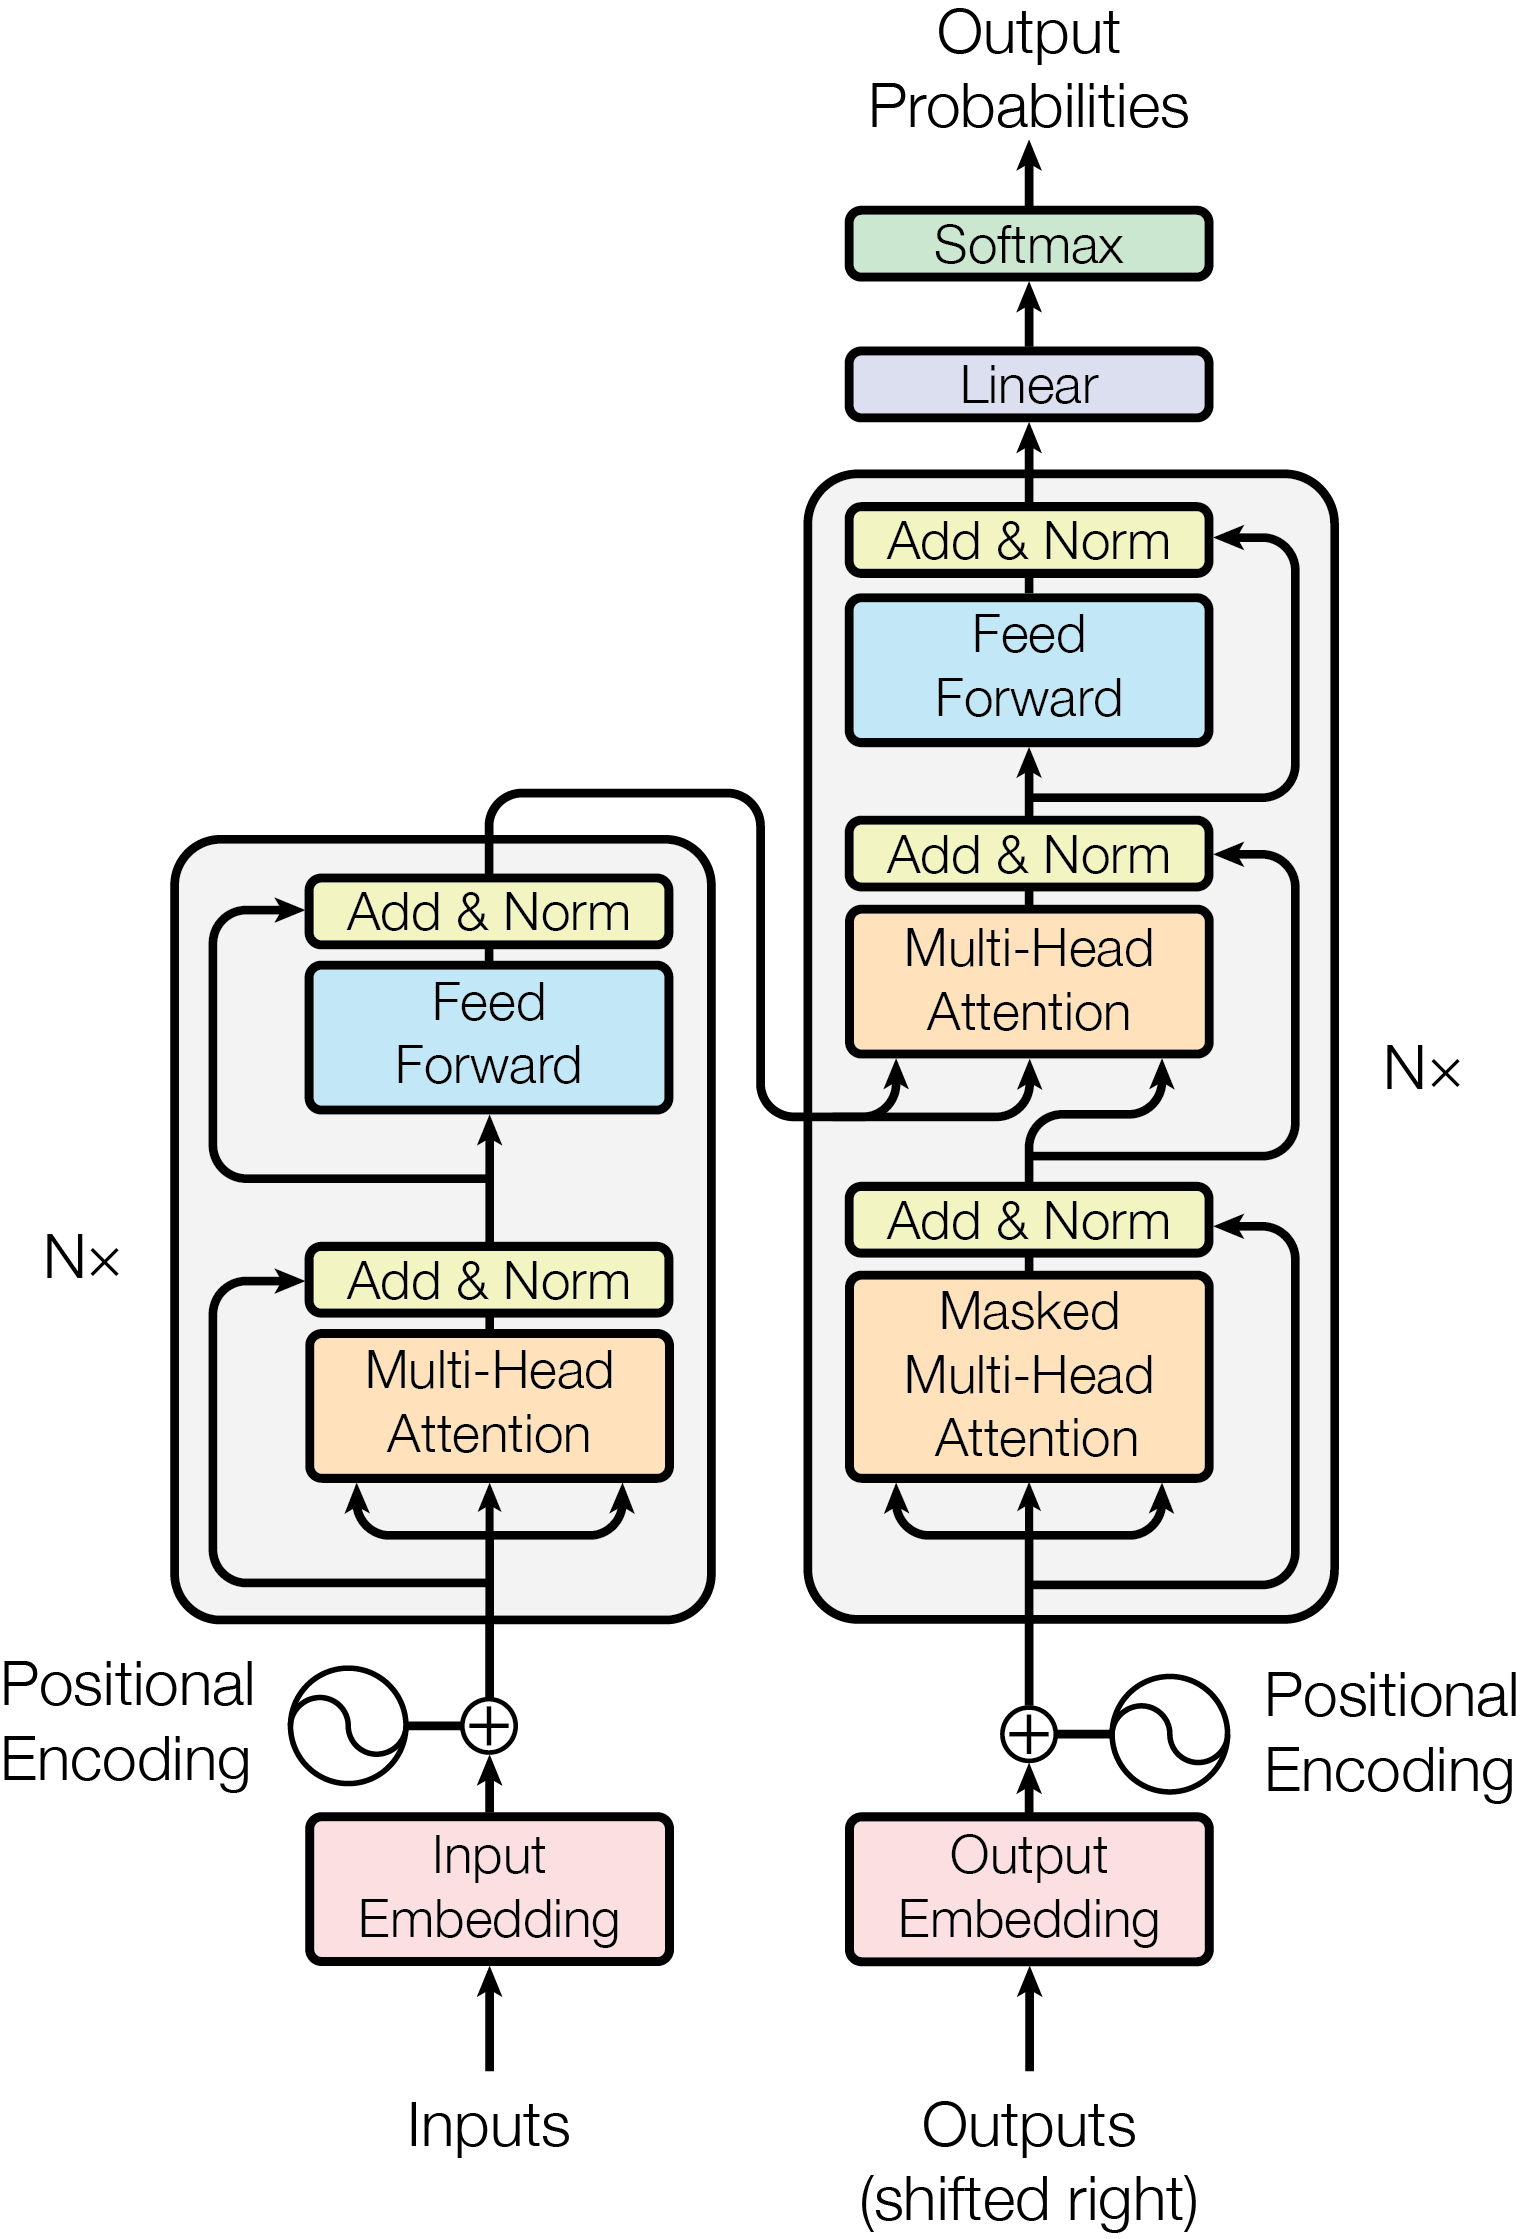
LLMs like GPT2 (if you can even call GPT2 “large” nowadays) are made of transformer blocks that contain several feed-forward and linear blocks that rely on torch.nn.linear blocks in PyTorch implementations. As you can see in Figure 1 from “Attention is All You Need”
Start by going to PA6/inference_gpt2.py On line 8, add from opencl_functions import ocl_matmul. On line 17, you will find a line of code that reads output = torch.zeros(output.shape).to(input.device). Replace this with output = ocl_matmul(input, self.weight.t())
Notice all of this is going to be used in our custom_forward function. ocl_matmul is the name of a wrapper function in C++ that will be called in Python to interface with the pytorch code. This wrapper function is part of the library opencl_functions. However, we will need to build this library and have Python install it so it knows it exists.
Go to PA6/setup.py
On line 13 after os.path.join(here, '../helper_lib'), add also os.path.join(here, 'opencl_functions'), so you have the following code:
setup.py gets called when we build the Python wheel for this PA. This will link the C++ code we are writing to Python, so we can do things like from opencl_functions import ocl_matmul.
At this point, you should be able to make run to build it, then have this horribly fail because nothing has been implemented.
Go to PA6/opencl_functions/ocl_wrapper_torch.cpp There are two methods in this file, one for ocl_matmul and ocl_conv2d. Observe here that this is trying to change the types of the variables from the PyTorch world (tensors) into things we can actually use in our normal OpenCL world (Pointers to arrays)
One line 23 add matmul_impl(a_ptr, b_ptr, c_ptr, m, n, k);
This is the actual method that implements the OpenCL host code. This method is implemented in PA6/opencl_functions/opencl-function.cpp
Go to PA6/opencl-functions/ocl_wrapper_torch.cpp
In PA6/opencl-functions/ocl_wrapper_torch.cpp, you will see the start of the code needed to run unbatched matrix mutliplication. We could replace this with our matrix mutliplication version or we could instead use clbast!
Implement :codeL:`clBlast::Gemm` to make matrix mutliplication work correctly! Note no matricies are being transposed.
A is of shape M by K B is of shape K by N C is of shape M by N
If you need help here, check out the clbast docs
Now, if you run make gpt, this will build and run python3 inference_gpt2.py
You should see the output as “Hello, I’m a language model, I’m a problem solver.nnWhen I started translating, I was trying to solve my.” If you do not see this output but instead some random nonsense charaters (like wswsws), the shapes are not quite right.
At this point, you should have a decent idea of how everything links up and how we are implementing OpenCL for this particular PA. So now that we have done that. Let’s get back to convolutions.
Part 2: Implement PyTorch’s Conv2d Layer And Listen To Screaming Pihas
We will do the same sort of thing for Conv2d. And by we, I mean everything, for calling our Convolution Kernel from PyTorch is implemented (see PA6/utils/conv2d_forward.py). We will use this forward function that mimics the behavior of the forward function in Conv2d for pytorch
(Hint: of all the things linked on this PA, PLEASE READ THE PYTORCH DOCS ON Conv2d. This was literally what this PA was designed against.)
For this Part, we can look at two Python scripts to help us develop our implementation. Take a look at the following things:
PA6/simple_sanity_check.pybasically mirrors PA5 with image filters over CSE 160’s favorite Legally Distant Character! This checks against the conv2d implementation from Pytorch, if you want to check your method with Mr. Legally.PA6/inference_resnet.pywill call Conv2d to identify some of the interesting animals that the CSE 160 students and teaching staff have submitted as pets. This Model uses a resnet18PA6/inference_bird.pywill call Conv2d multiple times to classify if a spectrogram is a representation of one of 132 possible Peruvian Bird Species: The Screaming Piha (this model was actually trained with OpenCL! Check out extras/train_audio.py). This Model uses a resnet50. The data from this comes from a subset of the PER train split of birdset, and you can listen to this bird on xeno-canto
Use both of those to help you develop this method.
So, we will do the same sort of thing for Conv2d, I mean you will implement everything relating to convolution in PA6/opencl_functions/opencl-functions.cpp and PA6/opencl_functions/conv2d.cl
Brief explanation of the convolution.
Inputs of the data will be of the shape (B, C_in, H, W) where B is the number of batches, C_in is the number of input channels, H is the height of the data, and W is the width of the data.
The convolution masks are in the shape of (C_out, C_in, K_h, K_w), where C_out is the number of output channels (convolutional layers often apply many different masks over each channel of your input data), and K_h and K_w are the mask input and output size These convolution masks in ML models, when stacked in this way, are referred to as feature maps (think of these as the convolutions are mapping the input to some high-dimensional feature space)
You will also be implementing stride (both height and width), dilation (both height and width), and a bias term. Padding is already performed over the input by the host device. You will not implement groups for this PA.
Stride is how far the mask moves over the image. In the previous PA, the stride was set to 1 in both height and width, meaning every pixel was the center of the mask. In this PA, some of the masks will be skipped over.
dilation changes what input data points are included in each application of a mask (you can think of this as spreading out the mask over the image)
Take a look at the animations provided here for what these parameters do to the convolution
If you need additional resources for this PA, again, check out the pytorch docs for Conv2d I cannot stress how helpful this will be. I used these docs to write this PA. A quick note before doing so: technically and confusingly speaking, convolution masks in the math world are known actually as Kernels because convolution is a type of kernel function. The PyTorch docs refer to Masks as Kernels. This is not to be confused with OpenCL kernels, which are the programs that run on accelerators. These docs will be particularly useful, especially when figuring out the size of the output.
Below is the pseudocode for this implementation for running this algorithm sequentially .. code-block:: none for b = 0 … B // for each image in the batch
- for m = 0 … M // for each output feature maps
- for h = 0 … H_out // for each output element
for w = 0 … W_out {
y[b][m][h][w] = bias[m]; //bias term, done per channel for c = 0 … C // sum over all input feature maps
- for p = 0 … K // KxK filter
- for q = 0 … K
y[b][m][h][w] += x[b][c][h * stride_h + p * dilation_h][w * stride_w + q * dilation_w] * k[m][c][p][q]
}
How to Compile
The PA6/opencl_functions/opencl-functions.cpp and PA6/opencl_functions/conv2d.cl files contain the code for the programming assignment. It can be run by typing make run from the PA6 folder.
How to Test
Use the make run` command to test your program, which will run python3 test.py
Grading
You will be graded for correctness with respect to the PyTorch implementation. A portion of the correctness grading is based on the tests in PA6/tests.py, which cover various padding, strides, dilations, and batch sizes. The other aspect of the correctness grading will insert your code into larger models and compare their results against the PyTorch implementation.
Your grade is also determined by the optimizations you perform, which are assessed based on the execution time of your kernel.
Submission
Submit the PA6/opencl_functions/opencl-functions.cpp and PA6/opencl_functions/conv2d.cl files on gradescope.
Optional
Again, we have an optional section on the PA for bragging rights. We cannot stress enough, this works on multiple machines.
Platform |
Device |
|---|---|
Intel® OpenCL |
Intel® Xeon® Platinum 8275CL |
Portable Computing Language |
NVIDIA GeForce GTX 1080 Ti |
Google Tensor |
Mali-G710 r0p0 |
Qualcomm Dragonwing™ |
Qualcomm Adreno™ 643 |
Super Optional
The goal of this course is not to teach you Machine Learning. However, some of this PA was made by training on OpenCL with PyTorch. If you are curious how exactly that works, you can
Go to PA6/extras/train_audio.py and run the training script yourself (make sure to have some space on your machine, BirdSet takes up a lot of space)
Check out https://docs-cse160.readthedocs.io/en/latest/PyTorch.html